Unit Testing in Visual Studio
Visual Studio provides its own test framework for C and C++ programs. The framework is written in C++, but can be adapted to test C code as well as C++ code. While the framework can be used to test any existing project, one of the common ways to use the test framework is to add the test code itself as a new project to the solution that is under test. We will look at testing the following code.
mathfuncs.h
#pragma once
#ifndef MATHFUNCS_H
#define MATHFUNCS_H

double square(double n);
double cube(double n);

#endif
mathfuncs.c
#include "mathfuncs.h"

double square(double n)
{
	return n * n;
}

double cube(double n)
{
	return n * n * n;
}
As you can see, we create two functions: one to square a number and another to cube a number. Testing that these functions work is a simple matter but seeing how it is done will illustrate all the steps in creating a test project for an existing project.
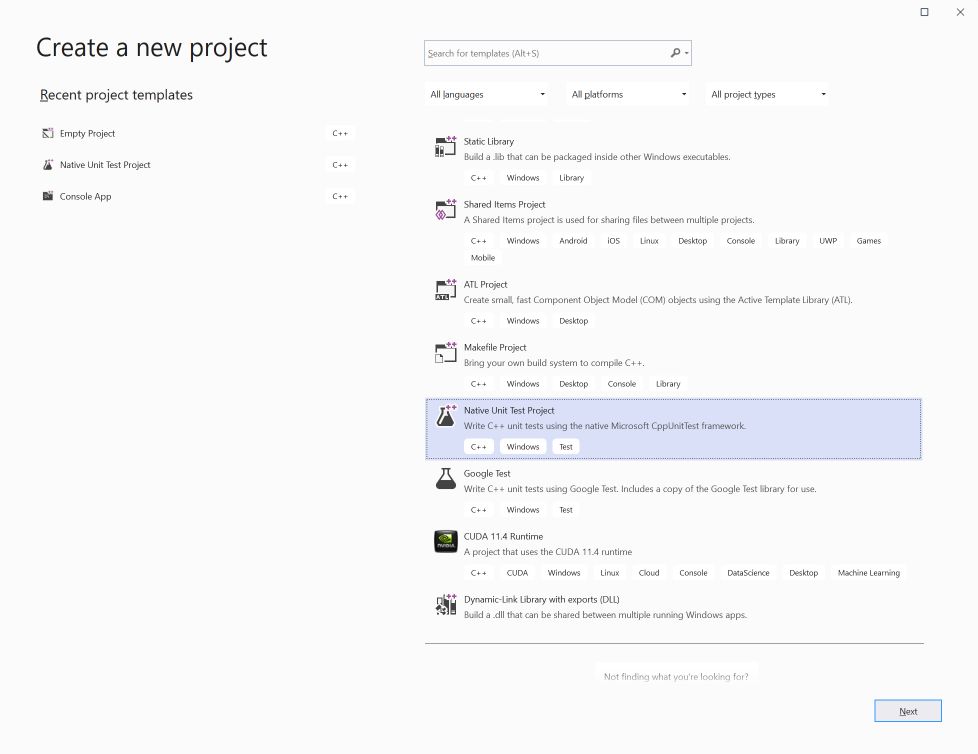
Open the project you want to test and then click on the name of the solution at the top of the solution explorer. Then, from the File menu, select New | Project. This will display the new project menu and you should select a native unit test project for C++ on Windows, as shown below.
Once the project has been created, you will see it at the bottom of the solution explorer. A skeleton unit test program has been created for you called UnitTest1.cpp (or whatever name you selected). I have modified this file to look as shown below.
#include "pch.h"
#include "CppUnitTest.h"
#include "mathfuncs_r.h"

using namespace Microsoft::VisualStudio::CppUnitTestFramework;

namespace MathTestSuite
{
	TEST_CLASS(MathTest)
	{
	public:

		TEST_METHOD(SquareTest)
		{
			double d = square(8.0);
			Assert::AreEqual(64.0, d);
		}

		TEST_METHOD(CubeTest)
		{
			double d = cube(3.0);
			Assert::AreEqual(27.0, d);
		}
	};

	TEST_CLASS(MathIntegrationTest)
	{
	public:

		TEST_METHOD(AdditionTest)
		{
			double d = square(8.0);
			double d1 = cube(3.0);
			Assert::AreEqual(91.0, d + d1);
		}
	};
}
I modified the namespace to be more meaningful and called it MathTestSuite. Within the namespace, I have created two test classes. Each class would usually represent the tests for a single function or feature. Placing tests in classes provides a convenient way to group tests together. Inside each class, there are test methods which each test one particular aspect of the code. In this example, I have one class to test the functions and a second class to test how the functions might work together. There is no set way to organize this and you are encouraged to layout your tests in the most organized fashion you can for your particular project.
Inside the tests, you call your functions with specific values and then use an assertion to determine if the result is correct by comparing it to a known value. The Assert class has many methods that allow you to compare values. If the two values pass the comparison, the test passes, otherwise it fails.
The methods of the Assert class are summarized in the following table.
| Method | Description |
|---|---|
| AreEqual(v1, v2 [, "error message"] ) | Compares v1 to v2 and throws an exception if they are not equal. If they are not equal, the optional error string will be displayed. |
| AreNotEqual(v1, v2 [, "error message"] ) | Compares v1 to v2 and throws an exception if they are equal. If they are equal, the optional error string will be displayed. |
| IsTrue(b1 [, "error message"] ) | If the Boolean b1 is not true it throws an exception. If not true, the optional error string will be displayed. |
| IsFalse(b1 [, "error message"] ) | If the Boolean b1 is not false it throws an exception. If not false, the optional error string will be displayed. |
| Fail([ "error message"] ) | This causes the test to fail and throws an exception. If called, the optional error string will be displayed. |
Accessing the Software Under Test
We have now created two projects in the same solution. The testing project needs access to:
- the .lib or .obj file for the software under test,
- the header files for the project or modified header files if the project is in pure C.
To make the project we are testing visible to the test code, we need to modify the values of the properties of the test project. You can do this by right clicking on the test project in the solution explorer and selecting properties. Once the properties are displayed, select Linker | General and then Additional Library Directories. This will display the dialog shown below.
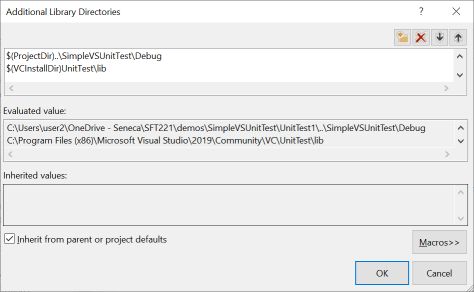
The goal is to add the debug directory in the project under test. This should be two levels higher in the directory structure and then into the project under test. Start by clicking the symbol for a new directory at the left of the top series of buttons. This will create a new row into which you can type the directory. While you can use the threee dots to navigate, this will result in an absolute path which will make it difficult to move the project to a different location. A better way is to use the macro $(ProjectDir) which will be set to the directory containing the source code for the test project. If the project is moved, this macro will be automatically updated.
Next, we need to provide the name of the file(s) containing the compiled version of the software under test. If you just have an object file, like we do here, then you can just enter the name, mathfuncs.obj. If you had build a library, then you would enter the name of the library.
The final step is to tell the test project how to find the header files for the project being tested. If this is a C++ project we are testing then we navigate to C/C++ | General | Additional Include Directories and add the include directory for the project under test. If the project you are testing is pure C, then the process is more complicated.
C++ compilers alter names of functions inside classes so that they can determine the class that a particular method belongs to. C compilers do not do this, and this creates a problem when we are trying to link C++ code with pure C code. In order to get the two language is to be compiled together, we have to tell the C++ compiler which functions are actually pure C so that it will not alter the names of them, but just use the original names. The way we can do this, is to use the extern “C” declaration as demonstrated in the next piece of code.
#pragma once
#ifndef MATHFUNCS_R_H
#define MATHFUNCS_R_H

extern "C"
{
#include <mathfuncs.h>
}

#endif
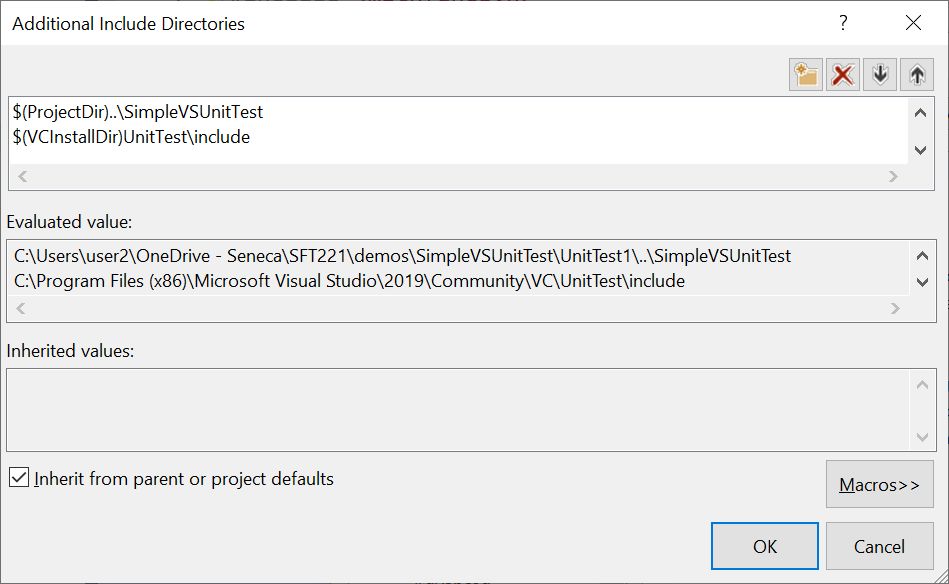
What I have done in this piece of code is to include the header file for the software under test inside an extern “C” block. This prevents the C compiler from altering the names and allows the two languages to be linked together. I called this file mathfuncs_r.h and placed it in the test project. The _r is used to indicate it references the original header file. Next, you need to tell the test project where to find the header files for the project under test. This is done by editing the test project properties under C++ | General | Additional Include Directories. You should add paths to include the directories in which the header files are stored for the code you are testing, as well as the test project. Once done, the include paths should look like:
The final step is to go the Build menu at the top and select *Build All** . You should ckeck the output window at the bottom to be sure that the solution compiled correctly. It should say that two projects were compiled and zero failed.
Running the Tests
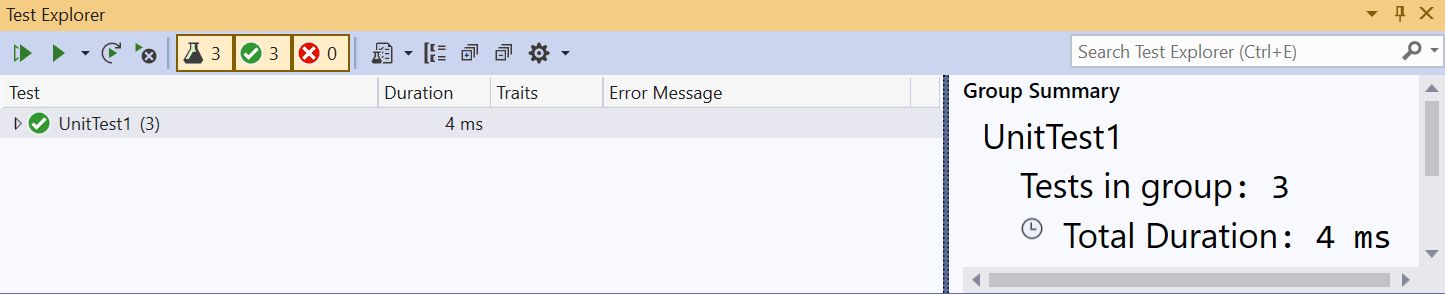
The next step is to actually run the tests. Go to the Test menu at the top and select Test Explorer. This will display a new window to control the tests, as shown below. This wildow can be left floating or docked into the Visual Studio window.
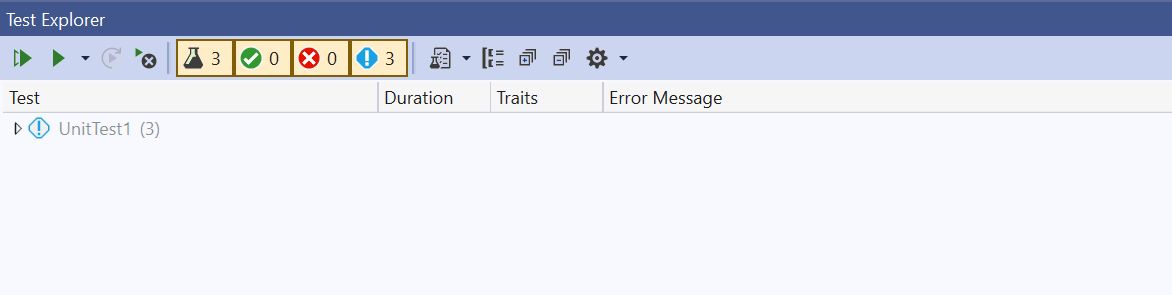
The Test Explorer shows:
- the list of tests,
- controls to run the tests,
- the number of tests available to run, the number passed, the number failed, and the number which have not been run,
- a sub-window at the right that will show the output of the tests.
With the test explorer, you can highlight the test(s) you want to run and then press the play button to run the tests. The results of the test are shown as you can see in the diagram below.
Setting Up and Tearing Down Tests
You can create additional functions to set up and tear down the tests. This would be needed if you required data structures to be set up before the tests were run and torn down after the tests were completed. There are functions for TEST_MODULE_INITIALIZE and TEST_MODULE_CLEANUP which are run before any of the class tests are run and after all class tests are complete. In addition, there are methods to go inside a test class called TEST_CLASS_INITIALIZE and TEST_CLASS_CLEANUP. These can be used to setup and tear down data structures required for each test class. There is a Logger class which is used to write simple messages to the test output. This is demonstrated in the code below:
#include "pch.h"
#include "CppUnitTest.h"
#include "mathfuncs_r.h"

using namespace Microsoft::VisualStudio::CppUnitTestFramework;

namespace MathTestSuite
{
	TEST_MODULE_INITIALIZE(ModuleInitialize)
	{
		Logger::WriteMessage("In Module Initialize");
	}

	TEST_MODULE_CLEANUP(ModuleCleanup)
	{
		Logger::WriteMessage("In Module Cleanup");
	}

	TEST_CLASS(MathTest)
	{
	public:
		TEST_CLASS_INITIALIZE(ClassInitialize)
		{
			Logger::WriteMessage("In Class Initialize");
		}

		TEST_CLASS_CLEANUP(ClassCleanup)
		{
			Logger::WriteMessage("In Class Cleanup");
		}

		TEST_METHOD(SquareTest)
		{
			Logger::WriteMessage("In Square test");
			double d = square(8.0);
			Assert::AreEqual(64.0, d);
		}

		TEST_METHOD(CubeTest)
		{
			Logger::WriteMessage("In Cube test");
			double d = cube(3.0);
			Assert::AreEqual(27.0, d);
		}
	};

	TEST_CLASS(MathIntegrationTest)
	{
	public:

		TEST_METHOD(AdditionTest)
		{
			double d = square(8.0);
			double d1 = cube(3.0);
			Logger::WriteMessage("In Integration test");
			Assert::AreEqual(91.0, d + d1);
		}
	};
}
We can run this code using the command vstest.console.exe UnitTest1.dll. This command should be executed in a Windows cmd shell and will produce the output shown below. Note the order in which the initialize and cleanup functions are run.
vstest.console.exe UnitTest1.dll
Microsoft (R) Test Execution Command Line Tool Version 16.11.0
Copyright (c) Microsoft Corporation.  All rights reserved.

Starting test execution, please wait...
A total of 1 test files matched the specified pattern.
In Module Initialize
In Integration test
In Class Initialize
In Square test
In Cube test
In Class Cleanup
In Module Cleanup
  Passed AdditionTest [< 1 ms]
  Passed SquareTest [< 1 ms]
  Passed CubeTest [< 1 ms]

Test Run Successful.
Total tests: 3
     Passed: 3
 Total time: 0.2394 Seconds