Jira
Jira is a popular tool for managing teams working on software projects. Jira is organized into projects and each project contains many issues. An issue represents something which needs to be done or attended to in some fashion. Issues might include:
- Features which need to be built,
- Design documents which need to be written,
- Software tests which need to be written,
- Software tests which need to be executed,
- etc.
A project is normally set up by the project administrator or project lead who then invites multiple other people to join the project. All of these people have access to the Jira board displaying information about the project and they can quickly see the state of the project. One of the common ways to display the state of a project is as a Kanban board.
Using Jira
Jira is one of the more popular tools for managing software projects today. It is certainly not the only tool, but it is one of the currently popular tools. Some of the capabilities that tools like this provide include:
- Adding users to your project,
- Creating issues and placing them in one of the Kanban columns,
- Assigning issues to one of the team members,
- Moving issues through the Kanban columns,
- Notifying team members when the status of an issue in which they are interested changes.
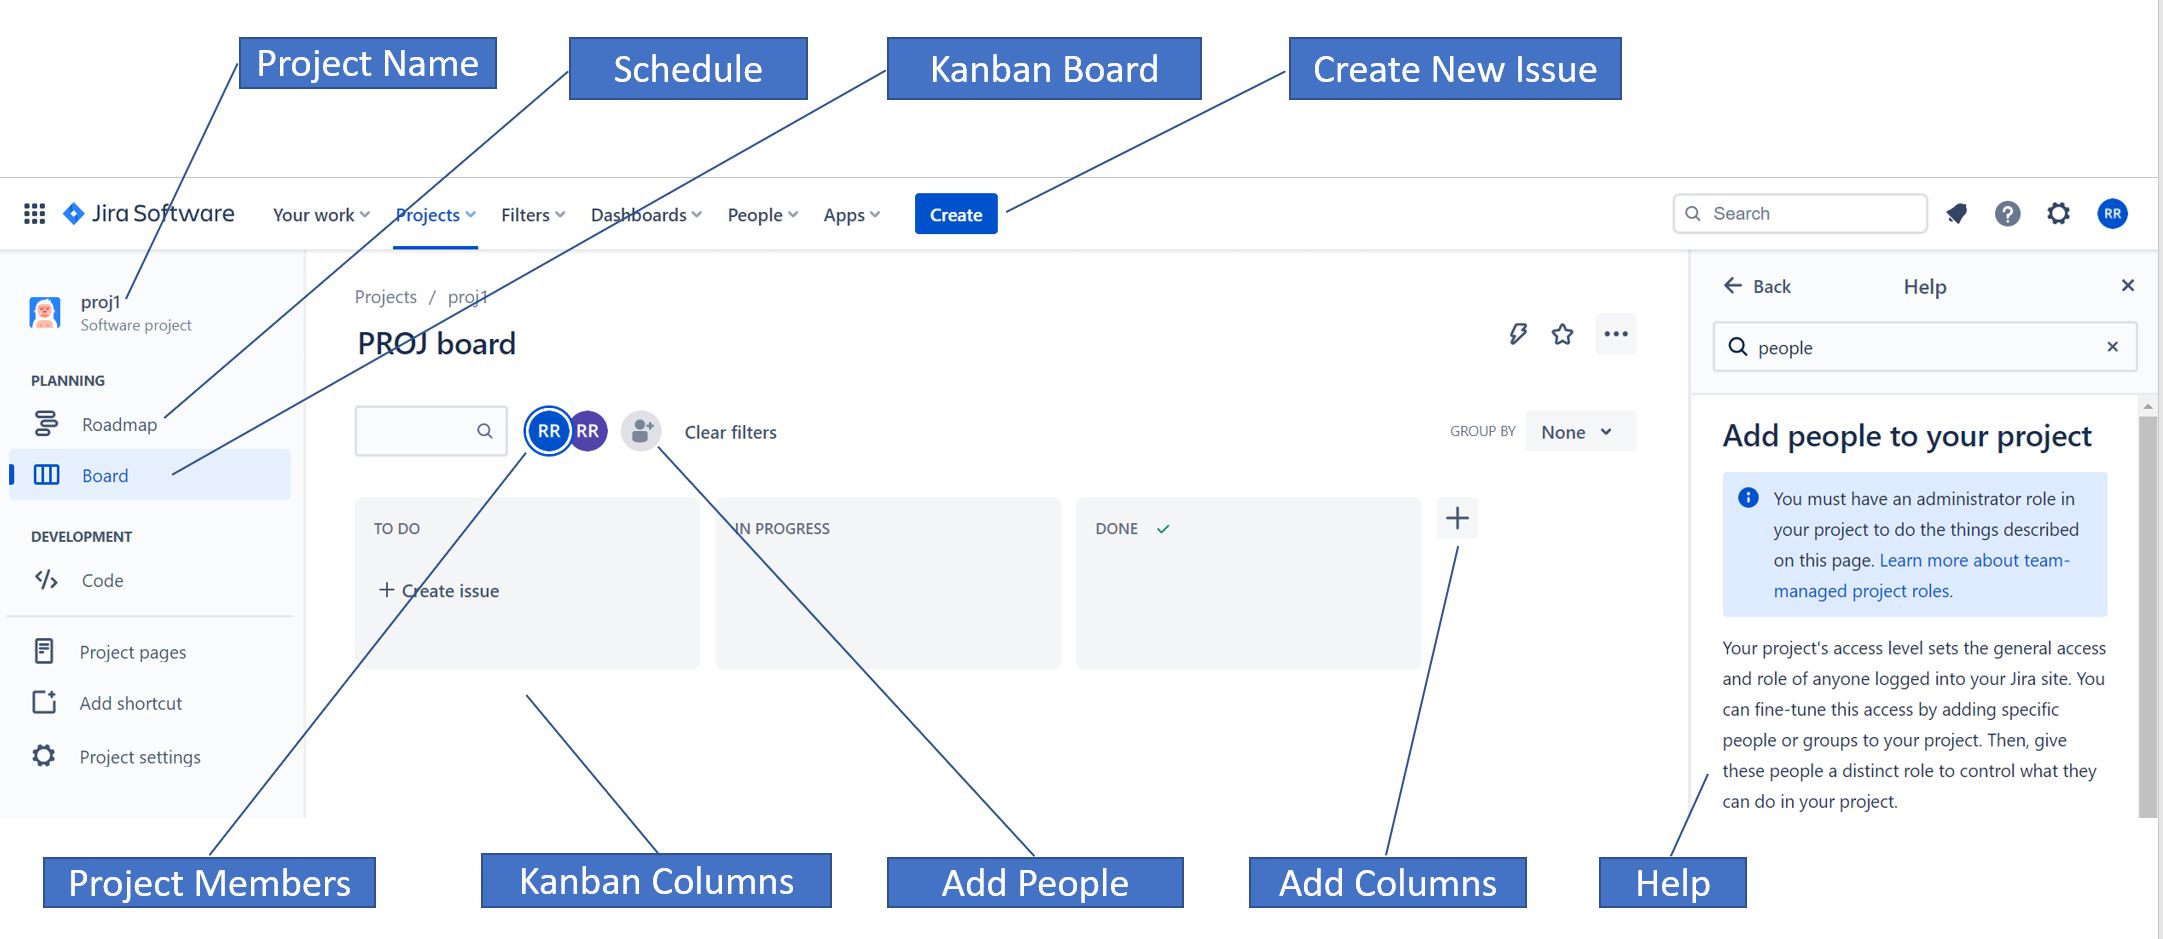
You can see the three Kanban columns in the image above. Issues can be created by using the Create button at the top. Once you assign an issue to a team member, the member will be notified by email. Issues can be dragged between columns as they move through the process. The + sign at the right allows you to add new columns to the board to customize it to your process.
When the board is created, it might not have all the issue types you want available. You can go to the project settings on the bottom left of the screen above and then select issue types to show the screen below.
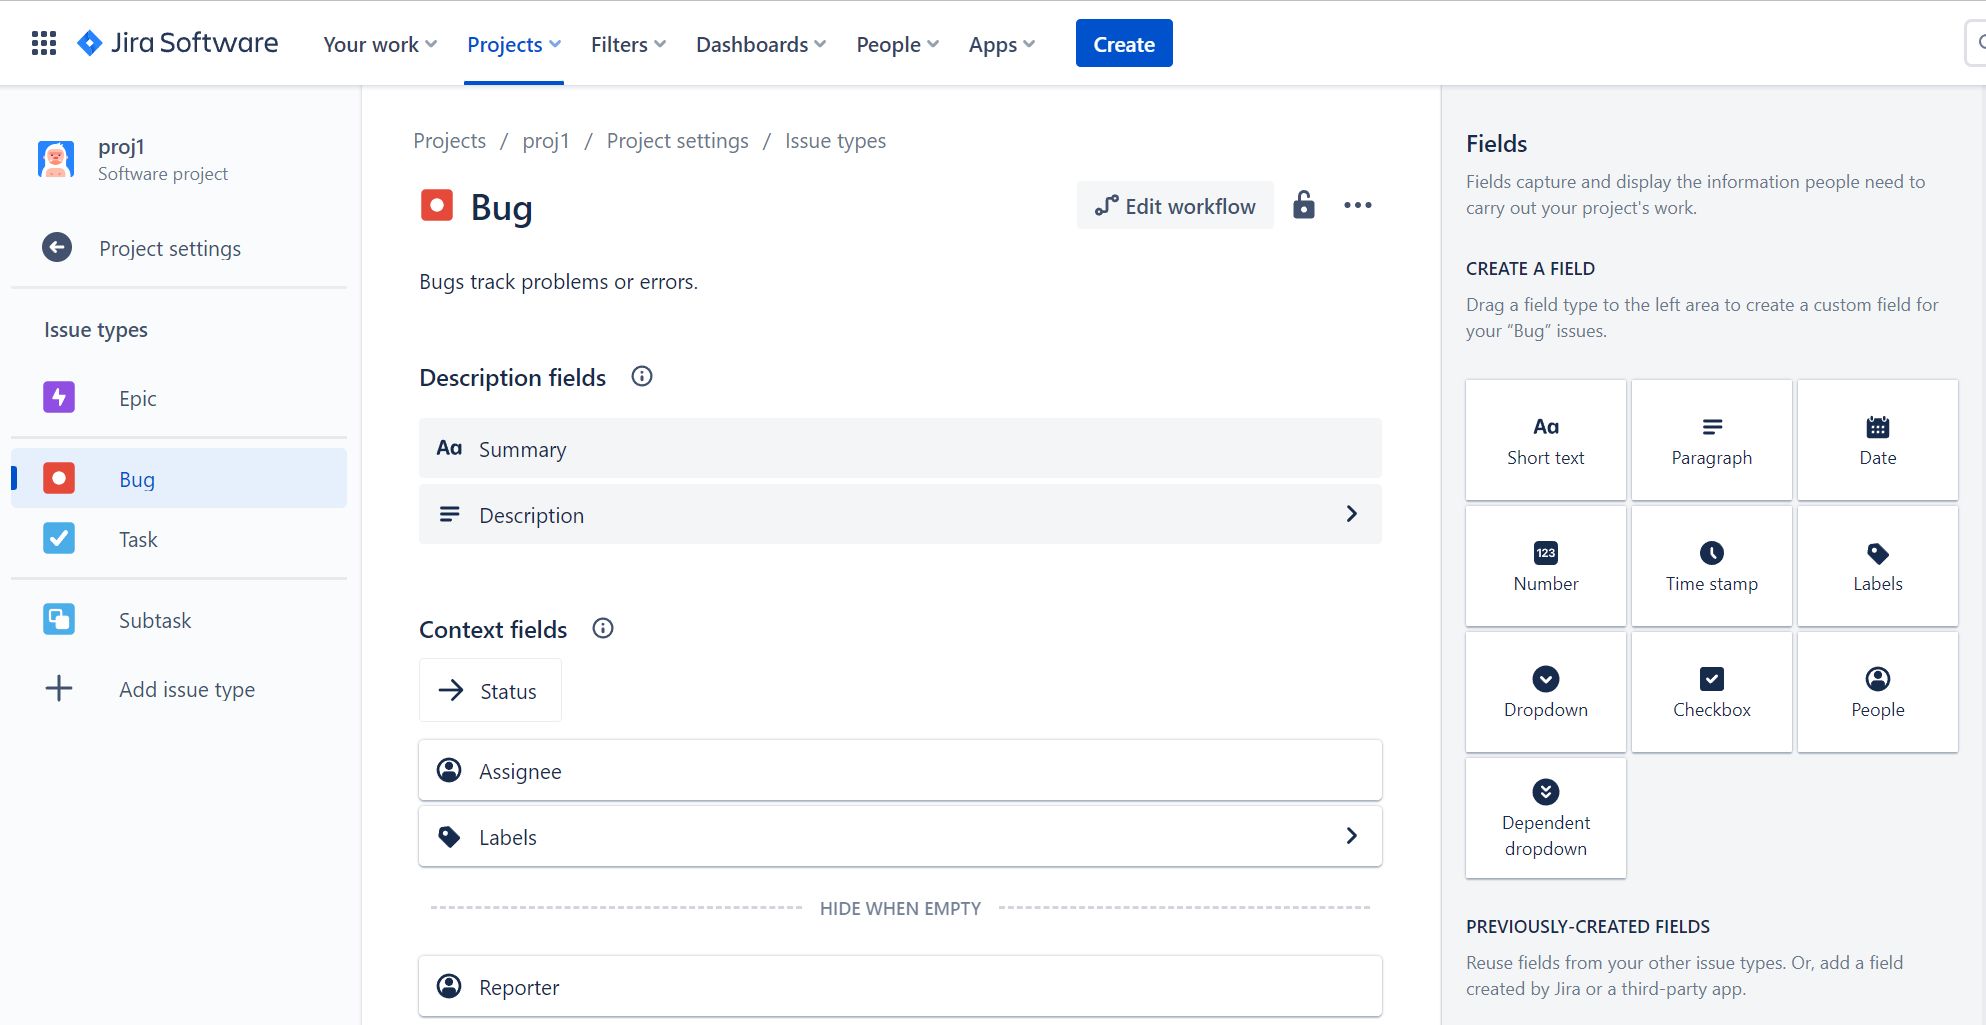
This scren allows you to add issue types. Some, like bug, are pre-defined and just need to be added to the list. You can also create your own issue types. The fields available to add information to the issues can be edited here to alter them to reflect your types of issues. New field types can be selected from the types on the right.
Creating Issues
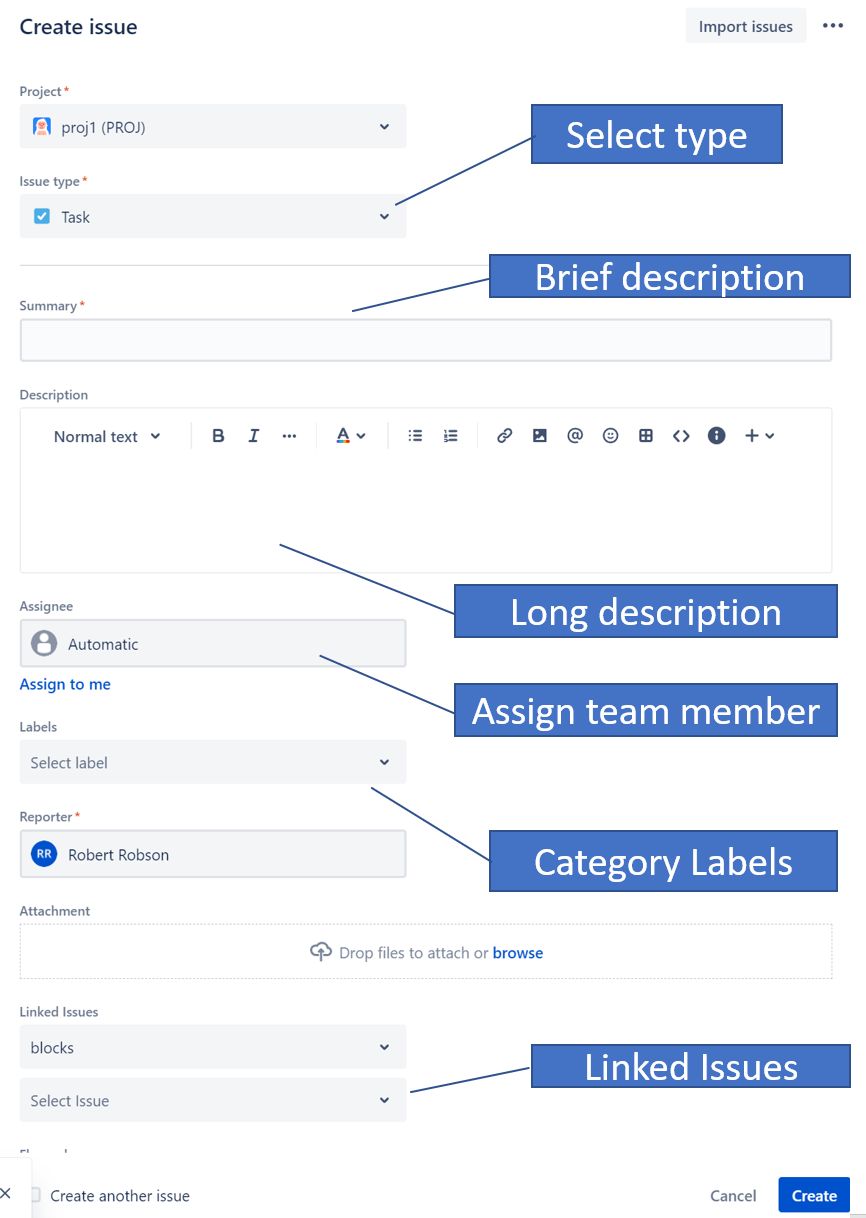
Issues can be created by clciking the Create button at the top of the main Jira screen. The resulting form is shown below.
Issue Types
After creating an issue, the first thing you want to do is to set the type of the issue. This can be done with the issue type combo box. The types of issues initially provided include: a task, a bug, and an epic.
- A task normally represents something which has to be done such as writing a test plan or implementing a piece of code.
- A bug represents a defect in the software which needs to be corrected.
- An epic is part of the story describing the system which is being implemented.
You can create additional types of issues if you need to by going to the project settings and modifying the issue types.
Brief Description
The brief description is a short, usually one line, description of the issue. It should be short and descriptive so that people can read it and quickly understand what the issue is about.
Long Description
The long description is where you get to write the details of the issue. Here you can describe what the issue is about, what it is related to, how it has to be resolved and other information that you would like to put down about the issue. If you need fancy formatting in this section, you can use markdown to format your text.
Assigning an Issue
When an issue is created, it can be left unassigned which means that no worker has been assigned to the issue or it can be assigned to one of the team members. The assignee combo box allows you to select one of the team members to assign the issue to. If you decide not to assign the issue at this point, you can assign it after the issue has been created.
Labels
Labels can be used to create categories for issues. To create a label, all you have to do is type it into the labels field. Once a label has been created, it will appear on the dropdown of available labels. Labels can be used to group issues into various categories. For example, you could have a label called implementation which groups together all issues related to performing part of the implementation of the project. You could have another category called test plan which is used to gather together all test plans.
Linking Issues
Issues can be linked together so that they are related to one another. The different relationships include:
- Blocks -- which means that this issue blocks another issue. As a result of this, the issue which is blocked cannot be performed until this issue is completed.
- Blocked by -- is used to indicate that this issue is blocked by another issue.
- Duplicates – this issue is duplicated by another issue.
- Related to – this issue is related to another issue.
The combo box below the link type allows you to select the issue to be linked to this issue.
Editing Issues
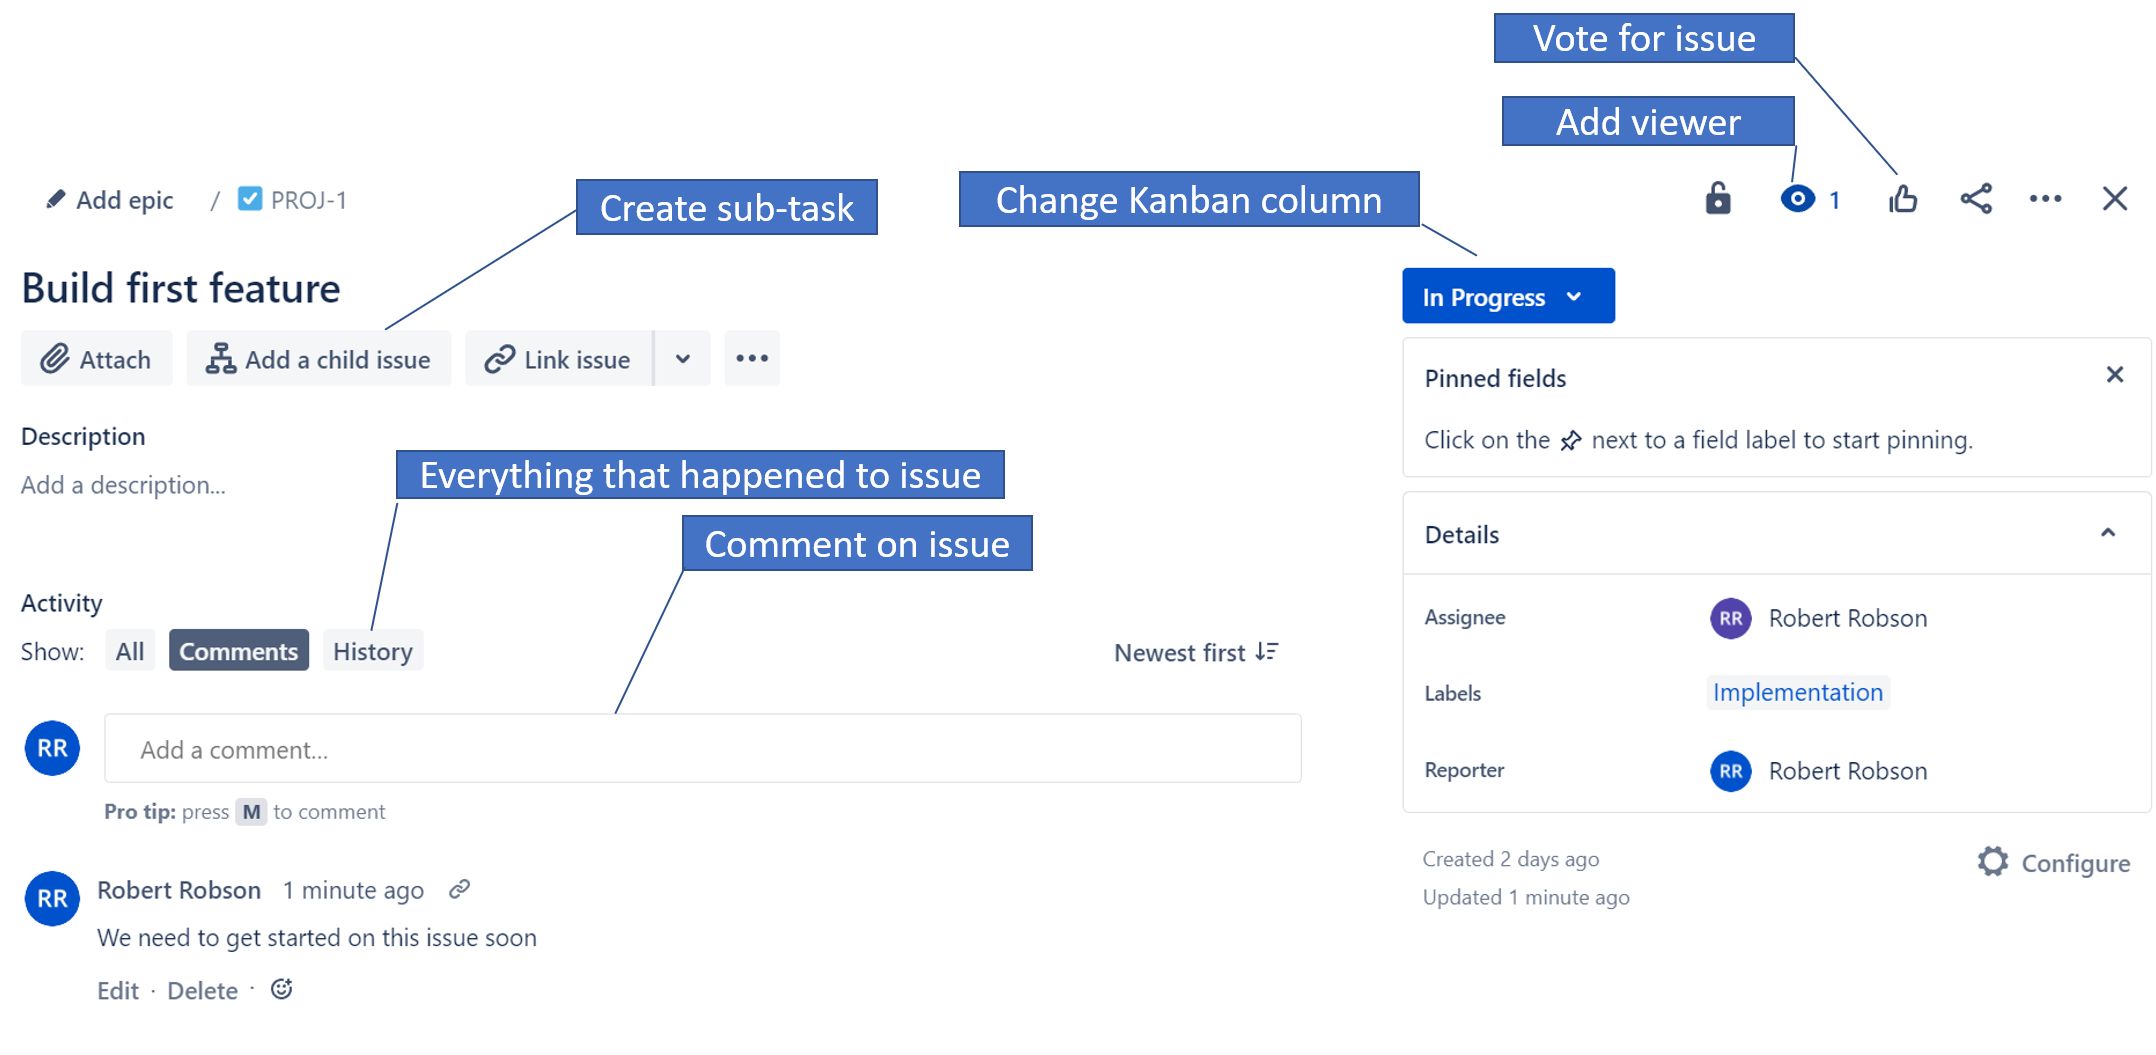
Once an issue has been created, you can click on it in the Kanban board and it will display the form to edit the issue.
Voting for Issues
Voting for an issue can be done to show that many people on the team would like to have this issue fixed. It can be used as a gauge of how important the team feels an issue to be.
Add Viewer
You can add viewers who will be notified if an issue changes. Just click on the eyeball and it will display a form to add a new viewer.
Change Kanban Column
You can change the Kanban column in which this issue resides by using the dropdown box to select a different column. This is another way of changing the status of an issue rather than simply dragging it between columns in the Kanban board.
Create Sub-task
A sub-task, or a child issue, is a smaller task which has to be done in order to complete the issue. You might break an issue down into child issues to split the work into smaller units of work or to be able to split it up based on the skills required to do it. Once you click the button to add a child issue, it will display a form allowing you to put in a brief description of the child issue, assign a team member to the issue, and set the status of the child issue.
Comments
You can add comments to an issue to say anything you want. It could be a comment on something which is holding up the issue, or a comment about a problem encountered in the issue. You can simply add a new comment onto the list and it will be added.
History
The history tab shows a history of everything that has happened to this issue. This can be useful if you want to review all the things that have occurred during the lifetime of this issue.
Searching and Filtering
Once a project gets going, there can be a lot of issues and it can be difficult to find what you want. Once you start to create labels and have different types of issues, combo boxes will appear just above the Kanban board. These allow you to filter the issues displayed to show just the issues of a particular type or issues with certain labels. These filters can be cleared by unchecking the options you selected.
To the left of the filters is a search box. You can enter keywords here and it will search the issue summaries and display all issues which match. To make good use of this, you should include identifiers like test ID's in the issue summary so they can be easily located by searching if you know the key.