Quality Assurance Workflow
There are a great many ways to develop a software project. No one way can be said to be right and another said to be wrong. Usually the difference comes down to the nature of the project and the workflow which works best for that particular type of project. In this section, we are going to look at a workflow that we will use to carry out the complete lifecycle of a small sized software project. By doing this, we will see exactly how we can use our tools to build a successful software project that has quality assurance built into the workflow.
Scrum
Scrum is an agile strategy where the team works in sprints. A sprint is a few days to a week and team members select the work they can complete during the sprint period. Rather than having a manager assign work to the team members, the team members themselves select the work they want to do. This has the benefit that work is selected by the team member most interested in a particular issue and most capable of working on it.
Project Workflow
In a project like this, we will use the tools we have discussed to help us manage the workflow. We will use Jira to manage the issues, the status of the issues, and use it to assign issues to personnel. Git will be used to store all of the documents produced by the project. An outline of the workflow that we will use is shown in the diagram below.
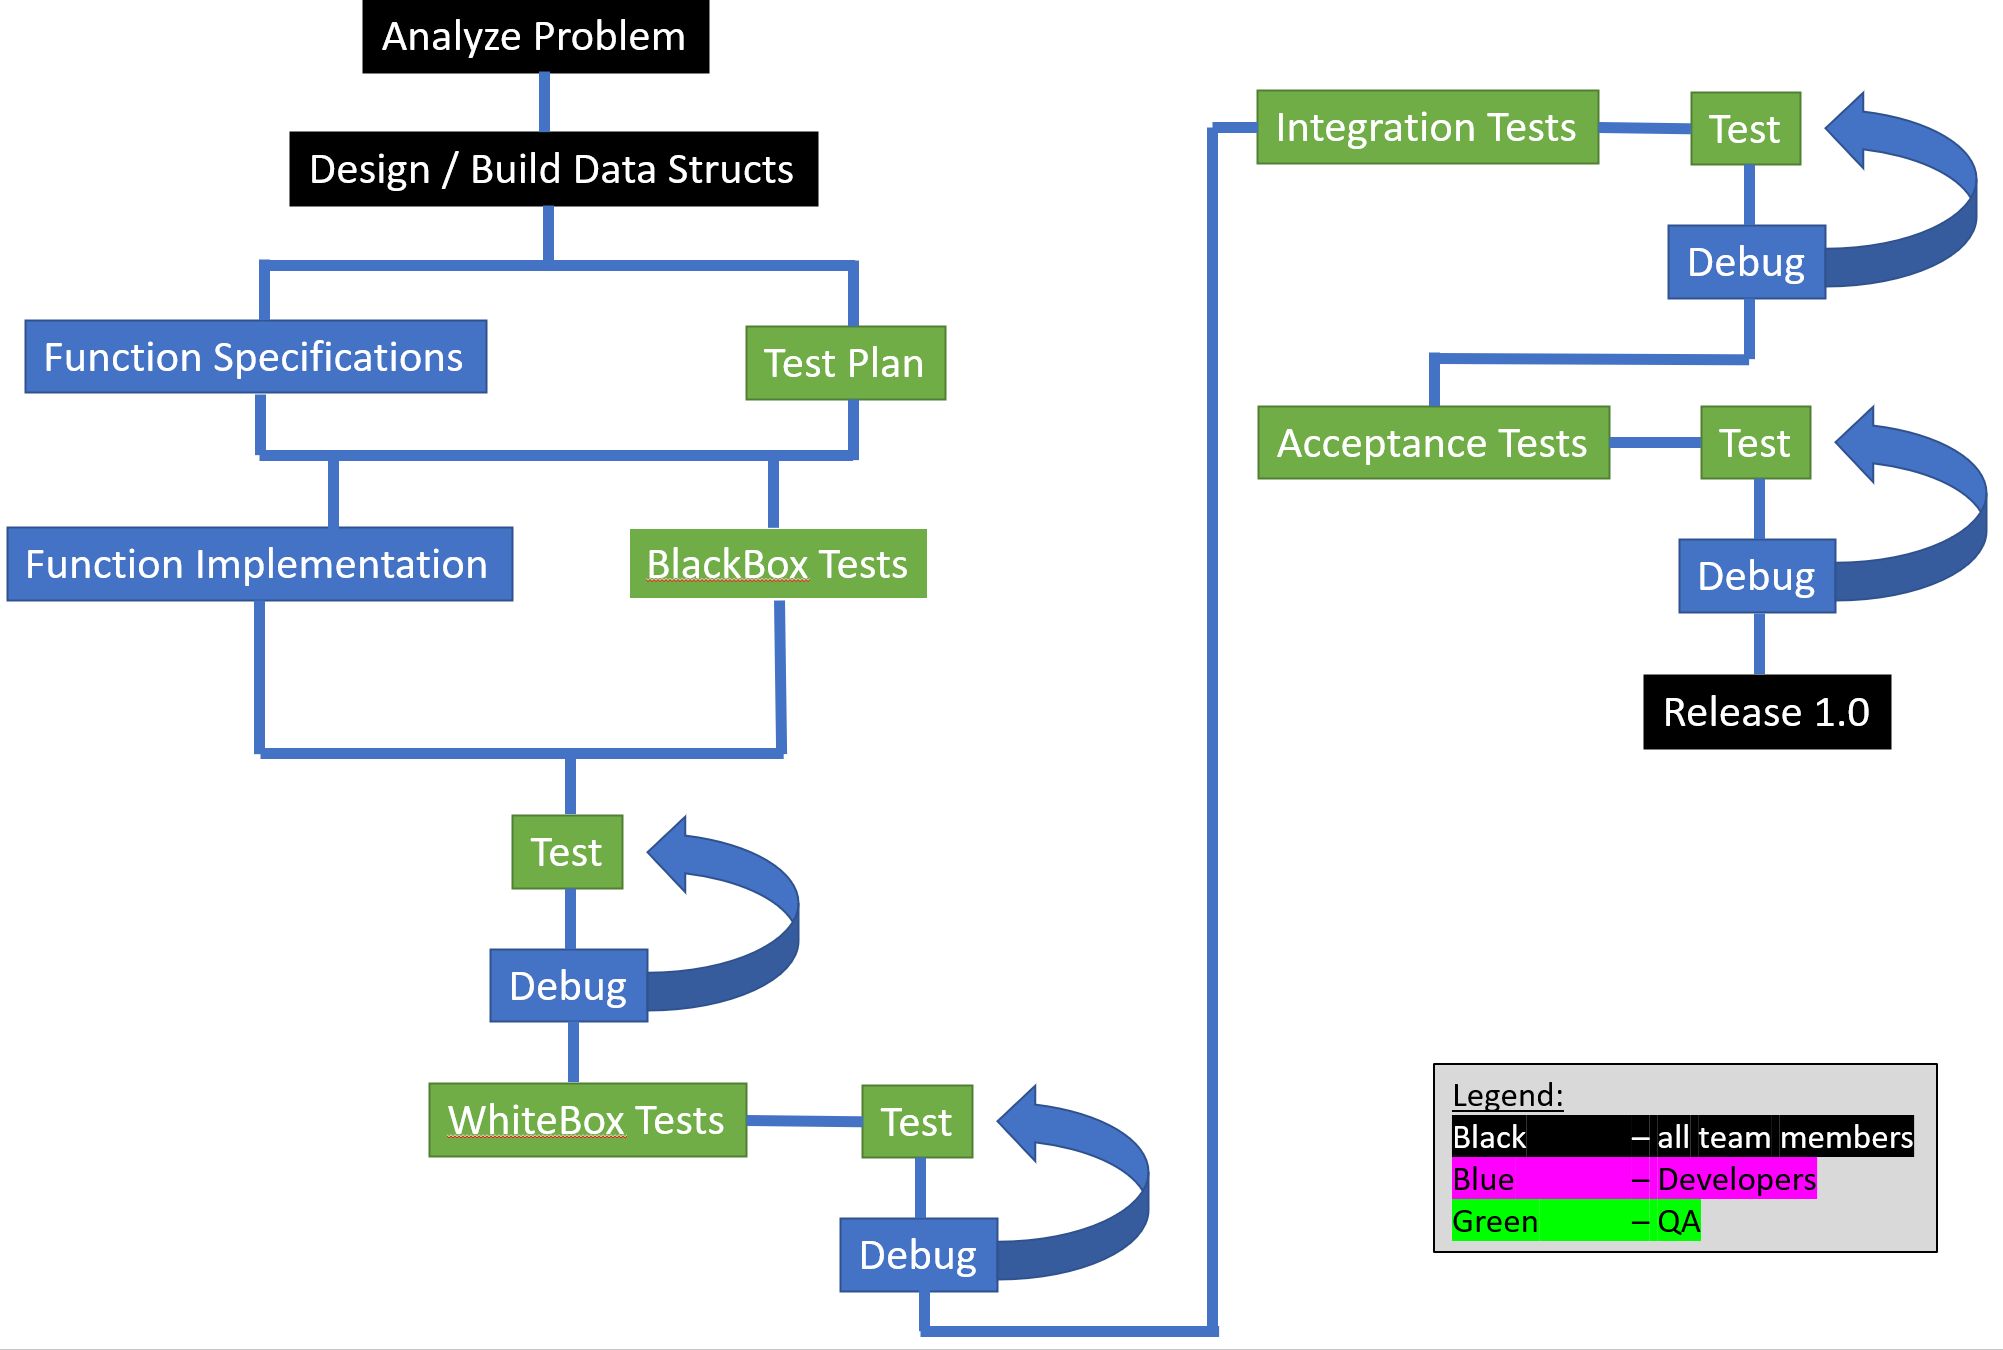
Step 1
The workflow begins in the top left of the diagram where the entire team will get together to read and analyze the problem. In this step, people will gain a good understanding of the problem so that they know enough about the problem to be able to come up with a solution. This will be a group activity, and it is expected that everybody will participate to facilitate the understanding of the problem. The detailed steps are:
- Everyone meets to analyze problem
- Identify data structures
Step 2
In the second step, the group will identify the data structures needed to store all the information about the problem. In modern software design, it is common to identify the data structures before you try and build the functionality of the system. During this step, the group will identify the data structures and roughly define their purpose and what they have to contain. Team members will use Jira to create issues, assign themselves to work on issues, and update the status of issues. The details of the step are:
- Create a Jira issue for each data structure
- A team member selects issue(s), assigns them to themselves, and creates the data struct(s) in header files
- Everyone reviews data structures
- Create bugs for problems found
- Team members pick a bug to fix
- Repeat steps 3-5 until data structures approved
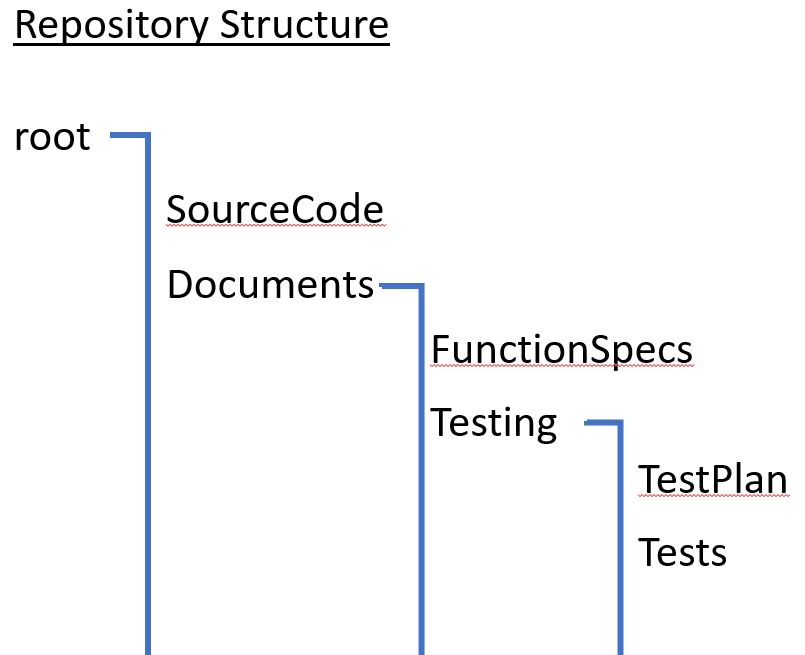
While every project is different and might require a different structure to the Git repository, the following structure is sugested as a good starting point to layout your repository.
Step 3
The third step will develop the function specifications in parallel with developing the test plan. The team will divide itself into developers and quality assurance members. The developers will work on the functional specifications while the quality assurance members will work on writing the test plan. All of the documents produced by these two sub-teams will be stored in the Git repository.
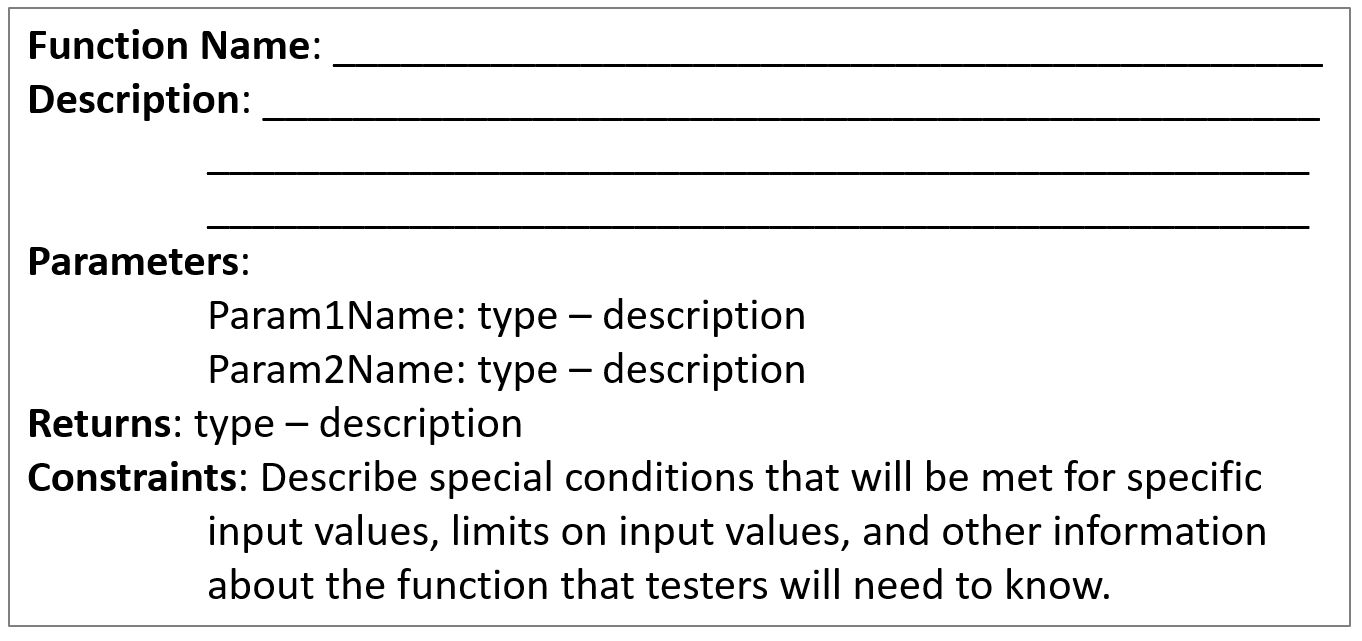
The format of a test plan has been described previously and you can refer back to the appropriate section of the notes if you need to review it. The specification of each function should include all of the information that the developer will need to be able to write the function as well as all of the information that the tester will need in order to write black box tests for the function. This means that you will need to write detailed descriptions of exactly what it is the function does as well as detailed descriptions of the input values for the function, the outputs produced by the function, as well as any unusual conditions. The unusual conditions would typically include the fact that certain values might not be allowed for input or that under some conditions unusual output values will be produced. Unusual conditions might also describe odd situations in which the function will do something other than what you would expect it to do. The following format can be used to capture the specification for each function.
The detailed steps are:
- Create an issue for each function specification
- Create an issue for the test plan
- Team members select an issue to work on
- Write documents and store them in the Git repository
- Review documents and create bugs
- Repeat steps 3-5 until complete.
Step 4
In the fourth step, the function specifications and test plan will be passed onward to the team members working on this step. The developers will use the function specifications to write the code for the functions and store it into the evolving source code for the solution. While the developers are implementing the functions, the quality assurance group will be writing the black box tests as well as implementing the actual code for the tests. Both of these groups will submit everything they produce to the Git repository. The details of this step are:
- Issues are created for the implementation of each function and the tests for each function
- Team members select the issues they want to work on. Tests are added to Git as documents and the associated code is added to the source code. Function implementations are added to the source code.
- The work is reviewed and bugs created in Jira
- Steps 2-3 are repeated until complete.
Step 5
The fifth step is all about running the unit tests that were developed in the fourth step, identifying any bugs, reporting the bugs, and having developers fix the bugs. The detailed steps are:
- Add issues to execute each of the tests
- Team members will take tests and perform them
- Failed tests will be reported as bugs to Jira
- Team members will take bugs and fix them
- Repeat steps 2-4 until complete.
Step 6
Now that the code has passed the unit tests, the structure of the code is close to finalized. The QA members will examine the code to develop white box tests and add the test documents and test code to the Git repository. Once tests start being completed, members of the team can start exeucting them, reporting bugs, and fixing them. The details are:
- Add issues to develop white box tests for each function,
- Team members pick issues, write the tests, develop the code for them and check it into Git
- Once a white box test for a function is complete, an issue is added to have it executed
- Any failed test is added as a bug to be fixed.
- Repeat steps 2-4 until all tests developed and executed
- Team members pick a bug and fix it
- A test / debug cycle is performed until the bug is fixed.
- Steps 6-7 are repeated until no bugs remain.
Step 7
The team will now go on to assemble the data structures and functions into a working solution. The QA team will develop integrations tests and execute the tests. Any bugs found will be reported and team members will fix the bugs. The details are:
- Add issues to complete the implementation of the application.
- QA members will develop integration tests.
- Integration tests will be run and any bugs reported.
- Team members will pick bugs to work on and go through an edit / test cycle until fixed.
- Repeat steps 3-4 until no bugs remain.
Step 8
The QA team will develop the final acceptance tests and execute the tests. Any bugs found will be reported and team members will fix the bugs. The details are:
- QA members will develop acceptance tests.
- Acceptance tests will be run and any bugs reported.
- Team members will pick bugs to work on and go through an edit / test cycle until fixed.
- Repeat steps 2-3 until no bugs remain.