Version Control
Version control systems are repositories for software that are able to maintain multiple versions of the software. This means that every time you edit a file and store it in a version control system, it is able to save the previous version as well as the new version. The advantage of this is that if you make a mistake and you need to revert to a previous version, this can easily be done by the version control system. During software development, you can make a mistake and get many files that have been built upon a mistake in the code. You are then faced with the problem of what files have to be thrown away and replaced with previous versions. Version control systems simplify this for you by allowing you to mark all the files in a particular release. You can then easily back out all of the changes to the previous release. This will restore a working version of the software system without having to laboriously go through every file and figure out what has been changed.
Version control systems can run either locally on your computer or they can operate remotely. Remote version control systems store a copy of the version software on a network based server as well as on your local computer. Some version control systems only work remotely, while others work both locally and remotely. Version control systems which work locally, allow you to version software bits stored only on your own computer. This can be very useful when you are working on projects by yourself and want to have the security of versioning your software but have no need to share it with a group by storing it on a network server.
There have been many version control systems over the years and the current popular one is Git. Most people refer to this as GitHub which is the popular public network version of the Git program. Git itself is a program which is public domain and you can download and run locally on your computer. It will allow you to version software on your computer even if you don't have a network based repository for it. Git also works well with remote repositories and that is the way we will be using it in this course.
Benefits of Version Control
There are many advantages to using a version control system. These include:
- A complete history of every file so that you can see all the changes made to that file over time and who made the changes. In addition, most version control systems require that you add comments for every change made to the software. This provides another way of tracking not only what changes were made but the rationale for the changes.
- Branches can be made off the main history line for the project and you can branch off into a separate set of changes. The changes on a branch do not affect any changes made to the main line of the history for the project. A branch is like taking a copy of a software and making changes to it in parallel with changes which might happen to the main line for the software. This provides the ability to introduce new features and, if they are successful, merge them into the main branch. If they are not successful, they can simply be discarded. This encourages experimental software development without fear that your main product will be corrupted.
- Using a version control system enhances traceability because you can connect it to bug tracking software like Jira and have it annotate each change and related to bugs being fixed. This helps greatly when you are trying to determine if all of the bugs in a project have been addressed and how they were addressed.
- Having the software stored in a repository, either on the Internet or on another device, greatly enhances the security of your software. No longer are you in fear of losing everything if a disk fails since you have a backup copy in a repository. Of course, the repository itself needs to be backed up, but this can be done easily.
Git
Git has become the most popular modern version control system. Git is a mature product which is open source and actively maintained. It was developed in 2005 by Linus Torvalds the creator of the Linux operating system. Due to its popularity, there are a great number of developers who are already familiar with how to use Git and it is supported by many popular software tools.
Git is a distributed version control system which differs from its predecessors in one important way. Many of the predecessors, like subversion or CVS, stored all the history of the files on the server. This meant that there was only a single copy of the history and, if it was lost, all history for the project was lost. Git changes this by storing the history not only on the server but in every copy which is checked out. This means that there are multiple copies of the history existing at any time and losing one of those is not a catastrophic event.
Git has higher performance than many other version control systems and it is not confused by the renaming of files. When a file is renamed, it is able to track the file and its history despite the fact that its name has changed.
Git encrypts the information about the files and their version history. This not only protects the repository from malicious tampering, but it also allows you to detect accidental changes when files get corrupted. This greatly enhances the security of your source code.
Git Clients
A Git client is a program which communicates with either a local or remote Git repository. The Git client is able to perform all the operations necessary on the repository including creating a clone of the repository, adding new versions to the repository, and retrieving information about the repository. There are many different Git clients available. The simplest clients are command line driven, but like all command line programs, suffer from a learning curve. One of the most convenient Git clients to use is TortoiseGit. TortoiseGit is a client which is integrated directly into the Windows file browser. It provides a menu when you right click on a repository to perform all of the get operations on that repository easily. Many software applications, like Visual Studio, have also been integrated with Git and can do their own operations on a Git server.
We will make frequent use of TortoiseGit in this course and you should download a copy from https://tortoisegit.org/. Once you download your copy of TortoiseGit, follow the installation instructions and you will find that when you right click on a file the TortoiseGit menu will appear.

This is the menu that you will see if you right click on a file or directory which is not currently a Git repository. It allows you to clone, or make a copy, of a Git repository to the local directory, create a brand new empty repository here, or expand the menu to show more options. If you click on a directory which is already a Git repository you will see a different top level menu, shown below.

The sync options provides a popup menu to perform many types of sync operation. The Commit option is often used to commit your software changes and push them to the remote server. The lower option will display the cascading menu with many more options.
Before we explore all these options, we need a better understanding of how Git, and version control systems in general, work.
Working Copies
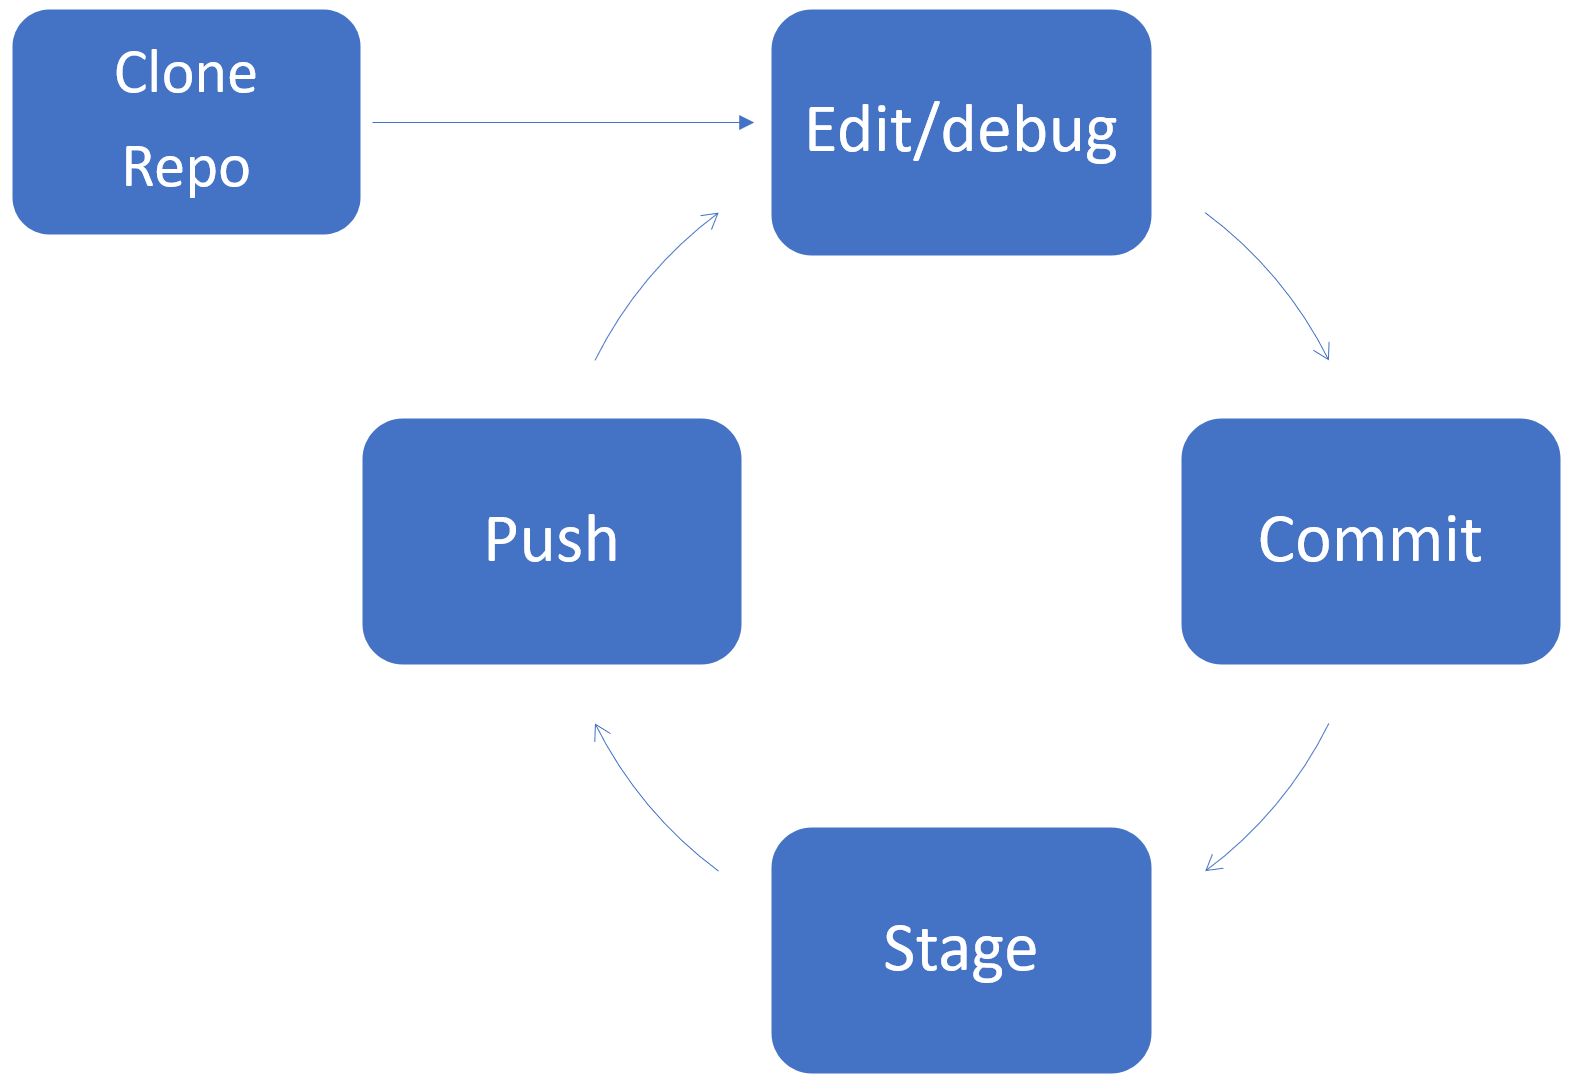
In a version control system, the repository is the master copy of the software. You almost never work directly on the repository. Changes are made to copies of the repository which you create by cloning the repository onto your local computer. When you clone the repository onto your local computer, you get a copy of everything in the repository, including all the versioning information. You are free to make any changes to your working copy of the repository that you want to. After you are finished editing the program and have achieved whatever goal you were working on, you can commit the changes and push them to the remote server. This creates a work cycle that is shown in the diagram below.
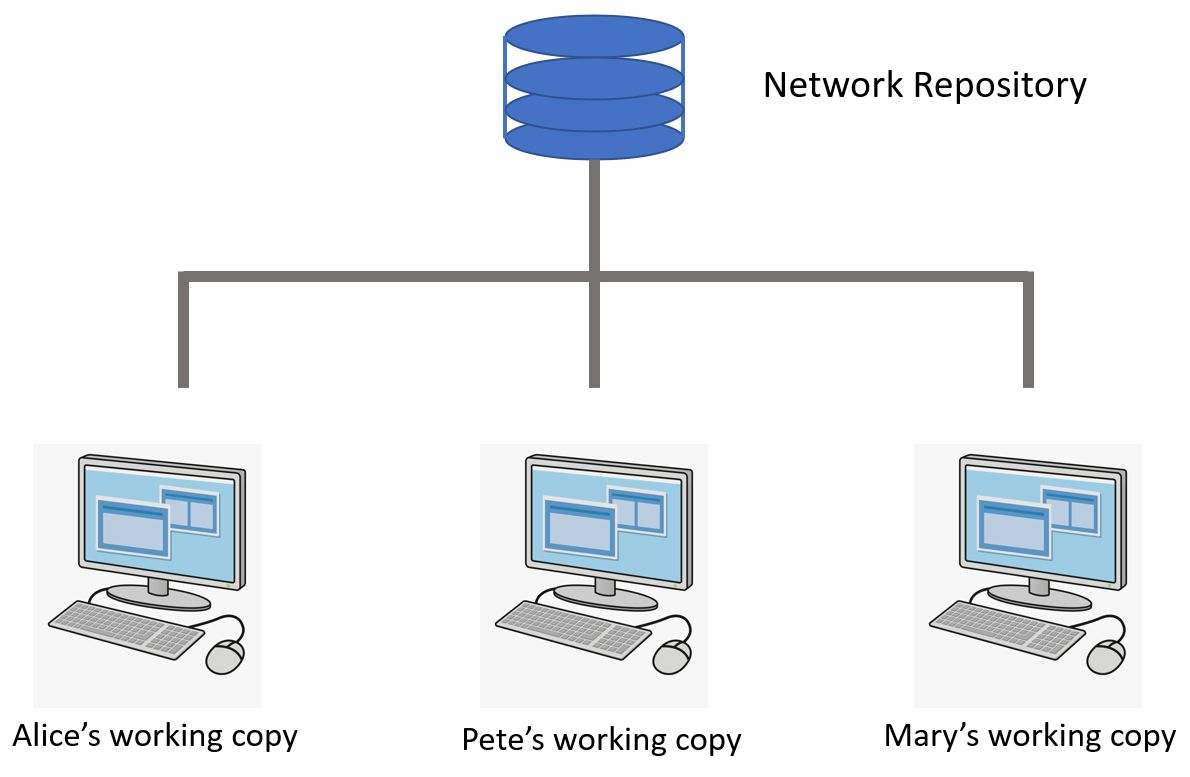
When you check out a working copy, it is nothing more than a copy of the original repository and you can delete it at anytime. When you delete it, you will lose any changes you have made, but the original repository on the network server will remain unchanged. This means that before you throw away a working copy you must upload any changes you've made to the remote server. The concept of multiple users having individual working copies is shown in the diagram below.
Each of these users would typically be working on their own part of the software. After going through many compile edit cycles and getting their software ready to be committed to the repository, they can upload their changes to the repository. You do not upload to the repository after every little thing you edit. You typically only commit to the repository after you have completed a body of work. It is also important that the software that you commit to the repository is ready to be downloaded by other people so that they can work on it. This means that your software should be bug free whenever you check it into the repository. If there are bugs in the software, then other people will potentially build more software on top of your bugs and a great deal of software will need to be thrown away to correct the bugs. We will talk more about this in the section on how you use repositories in the software testing lifecycle.
File Status
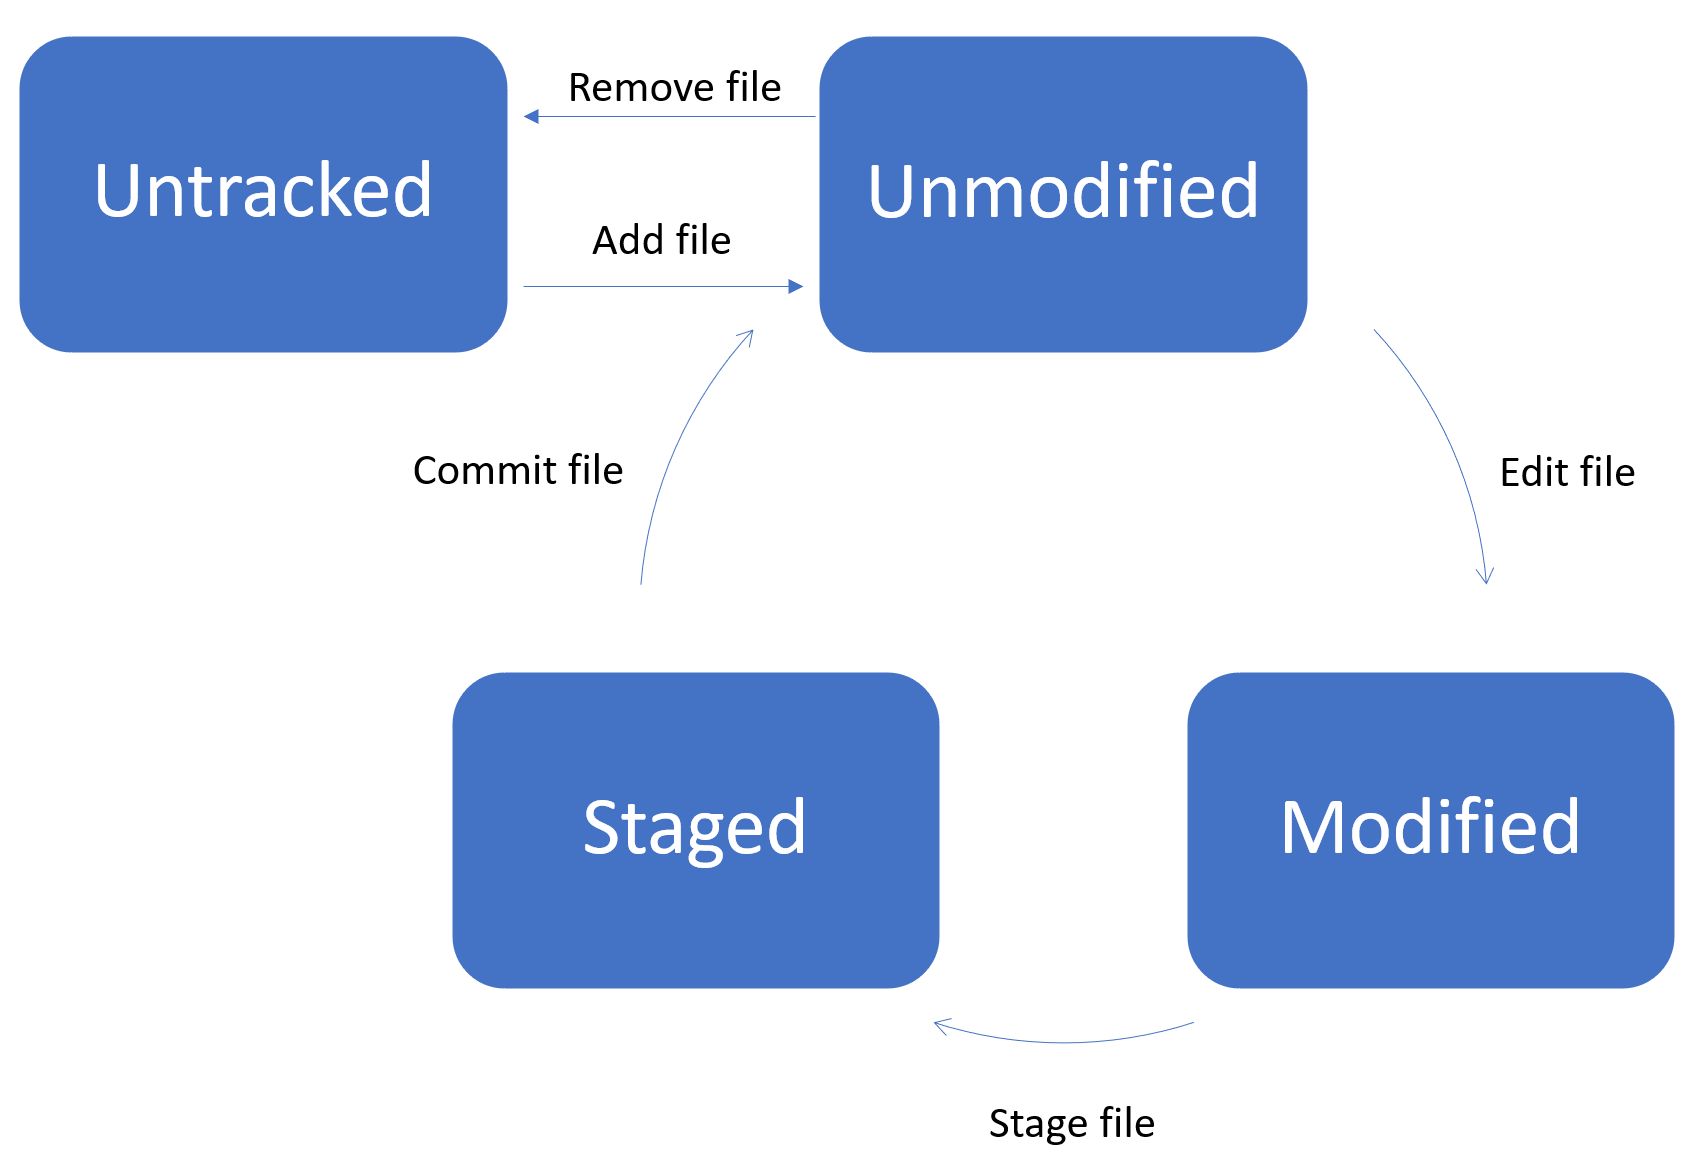
When you first create a file in a cloned repository, the file is untracked. This means that Git is not going to create versions of the file, and will generally ignore it. It is just a file which will be copied back and forth to the network repository but the history of a file will not be saved. If you want Git to track the history of a file you have to add the file to Git's control. Once a file has been added to Git, it will create the first version of that file. If you modify the file, its status will become modified. If you want to mark that file as ready for the next set of changes to be committed you must stage the file. Finally, you can commit all the staged files and this will set those files back to the unmodified state. This is summarized in the diagram below.
Staging files adds modified files to the list that will be committed with the next commit command. Some clients require that you explicitly stage files before a commit. Other clients, like TortoiseGit, combine the stage and commit into one operation where all modified files are automatically staged and committed in a single operation. In most cases, this is what developers want and it saves the extra staging step.
A commit adds you changes to the local repository and makes the new version of the file(s) the current version. It also saves the previous versions so you can go back to them if needed. The status of a commited file is set to unmodified since all changes have been saved.
If you want to check the status of your files, you can right click on the root of the repository, and use the cascading menu to select Check for Modifications, which will show the screen below.
If you have added new files to your project, you will see a list of unversioned files at the bottom of the list in their own section. If you want to add these as versioned files, you can click on them and select Add from the popup menu. This will move them from the unversioned section to the versioned section at the top of the list of files.
Similarly, if you have deleted versioned files, they will show as having the status Deleted in the list of versioned files. You can click on these and delete them so that Git will no longer track them.

This shows the status of the files and the number of lines that were changed in the files.
Stashing Your Work
Consider the case where you are part way through making a modification to the software and the boss comes over and says we've got a top priority job for you. Suddenly you've got another bug to fix but you don't want to lose all the work you've already done on the first bug. You also face the problem that you cannot work on the new bug until you finish fixing the old bug because the software is not in a state ready to be compiled. What are you going to do? Stash your changes!
In the status dialog above you see there is a button to allow you to stash your changes. When you click this button it will take all the files that would have been committed and save them away for you. It will then revert those files to their previous version and you will be able to continue to write software as if your attempts to fix the first bug had never happened. You can continue to use the repository normally, even doing more commits without losing the work you did on the first bug.
When you are ready to go back to your stashed work, You can pop the stash and have those changes come back and become modified files. You can then continue to work from that point on your original bug. When you stash some changes you should add a message to it to make it easy to identify what the stashed changes actually contain. You can stash multiple changes and then restore them one at a time.
The TortoiseGit cascading menu has options to stash changes, pop the stashed changes and view the stashed changes in case you have stashed more than one set of changes. The last two options will not be visible unless you have stashed changes.
Ignoring Files
Most software projects have the source files as well as a lot of artifacts from the build process. These could include object files, executable files, as well as many files built to track the software such as database files used by Visual Studio. All of these files can be regenerated easily and there is no reason to save them in the network repository. What you want is for Git to ignore these files. You can request Git to ignore files by listing them in a file in the top level directory of your git repository. The file must be called .gitignore and simply contains one file pattern per line. The file patterns can use wildcards to specify any file which matches. The * is the most common pattern matching symbol to use. The next listing shows an example of what a typical .gitignore file for a Visual Studio project might look like.
*.vsidx
*.lock
*.ipch
*.testlog
*.tlog
*.log
*.VC.db
*.manifest
*.VC.db-shm
*.VC.db-wal
*.VC.db-opendb
*.obj
*.exe
*.dll
*.lib
*.pdb
*.exp
*.exe.recipe
*.idb
*.sarif
*.dll.recipe
*.VC.opendb
.suo
.ilk
.pch
Any files in the repository which are matched by any pattern in the .gitignore file will neither be added to git automatically nor will they be uploaded to the remote repository. Using .gitignore greatly reduces the size of the remote repository, saves bandwidth during transfers, and reduces confusion because there are fewer files to deal with.
Communicating with the Remote Repository
So you have finished your work, edited all your files, and committed the changes. At this point, all of the changes have been made to the files in your local repository and the files have had the previous versions stored in the revision history. Now, you would like to share these changes with your team members. To do that you have to push the changes to the remote repository. The push command takes a copy of your local repository and uploads it to the remote repository. If everything works as expected, the remote repository will become a copy of your repository.
One of the problems which can occur is when one of your teammates has made a change and pushed it to the remote repository before you pushed your change. This can create a real problem because your repository is now out of sync with the remote repository. To avoid this, you should always do a pull on the remote repository before you push to the remote repository.
The pull action pulls any changes from the remote repository that are not in your local repository and brings your local repository in sync with the remote repository. You would do this for several reasons. First, to make sure that you are up to date on the work that your team members have been doing. Second, you should always do a pull before you do a push to make sure that you are up to date with other people's changes before you try and push your changes to the repository.
It is a good idea to pull regularly as you work. That way, you keep the local repository synchronized with the remote repository and keep up to date with the changes your team members have been making. It is normal to pull several times per day in a project with frequent changes.
Renaming Files
There is a rename command available from the TortoiseGit cascading menu. You can click on a file and use this option to rename the file. This is equivalent to deleting the file with the old name and then adding the file with the new name. The rename option combines these two actions and saves time.
Deleting Files
The TortoiseGit cascading menu has two options to delete a file. The Delete option will remove the file from Git tracking and will be deleted on the next commit. If you want to stop Git from versioning a file yet have the file retained as an unversioned file, use the Delete (keep local) option. This will stop versioning the file yet keep it as an unversioned file.
Viewing Changes
At times you might see that a file has been modified and need to remind yourself what you changed. You can click on the file and select Diff from the cascading menu. This will show the current file in the working tree compared with the previous version. The sections which have changed are highlighted. You can see the same comparison from the Check for Modifications screen by selecting one of the modified files and selecting the Compare with Base option.
Conflicts
Conflicts can happen when two developers change the same lines in the same files. One of the developers pushes their changes and all is well. The second developer tries to pull the version from the network repository and Git detects that the two versions of a file are not the same. It then compares the files and tries to merge the changes. Often, this will work as the changes do not overlap. If they do overlap, then there is a conflict and the pull fails.
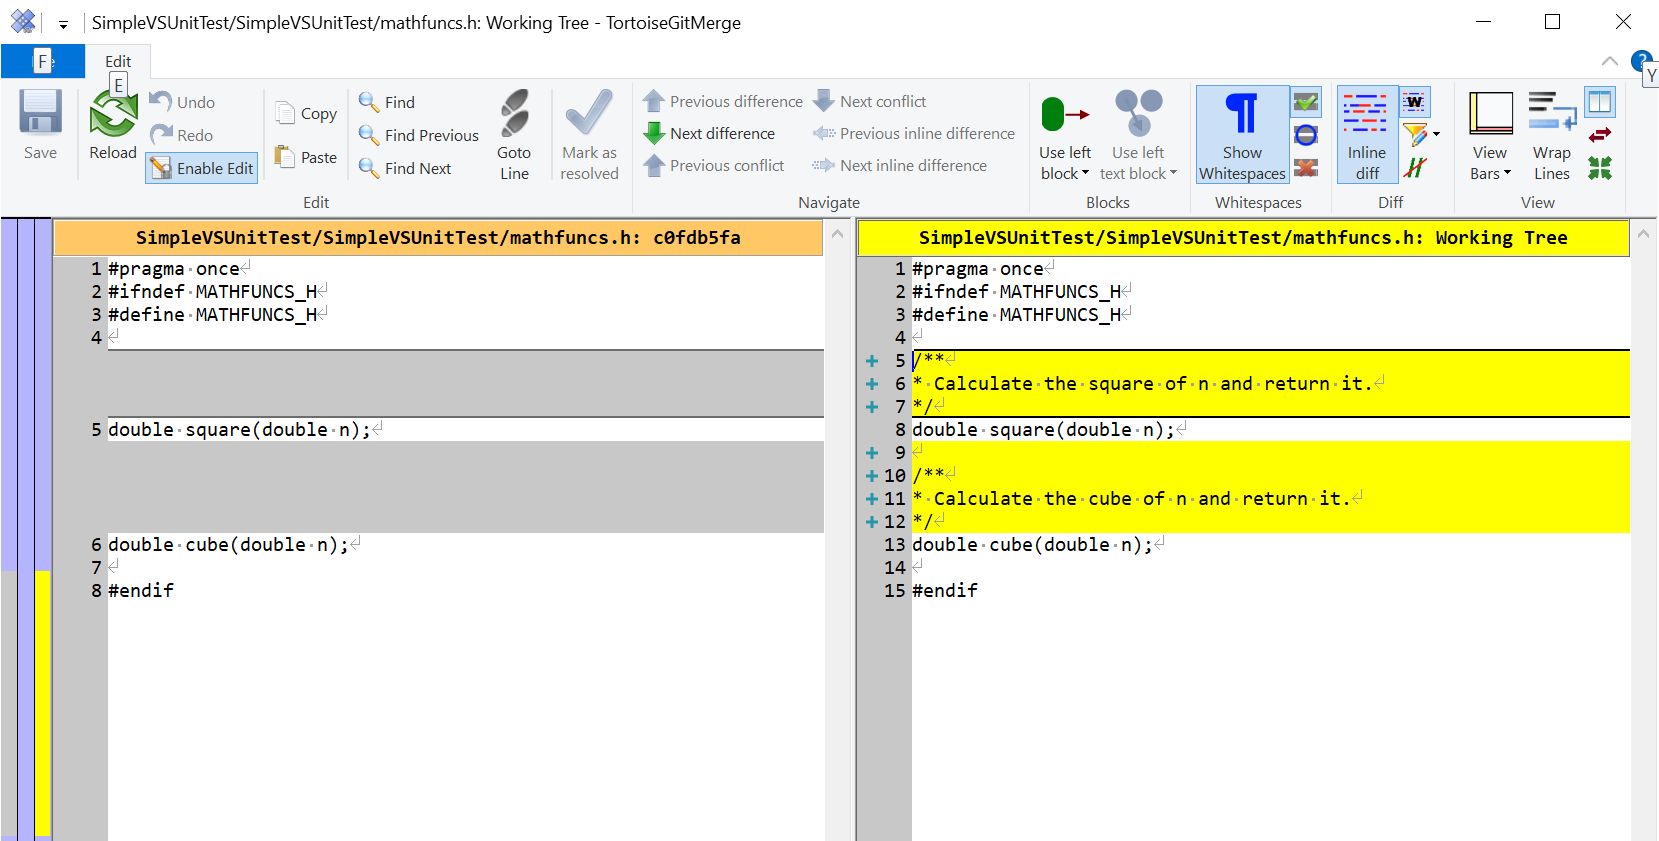
TortoiseGit tells you there is a conflict and shows a list of conflicting files. It then gives you the option to select a file and resolve the issue. This will display the two conflicting files as shown below.
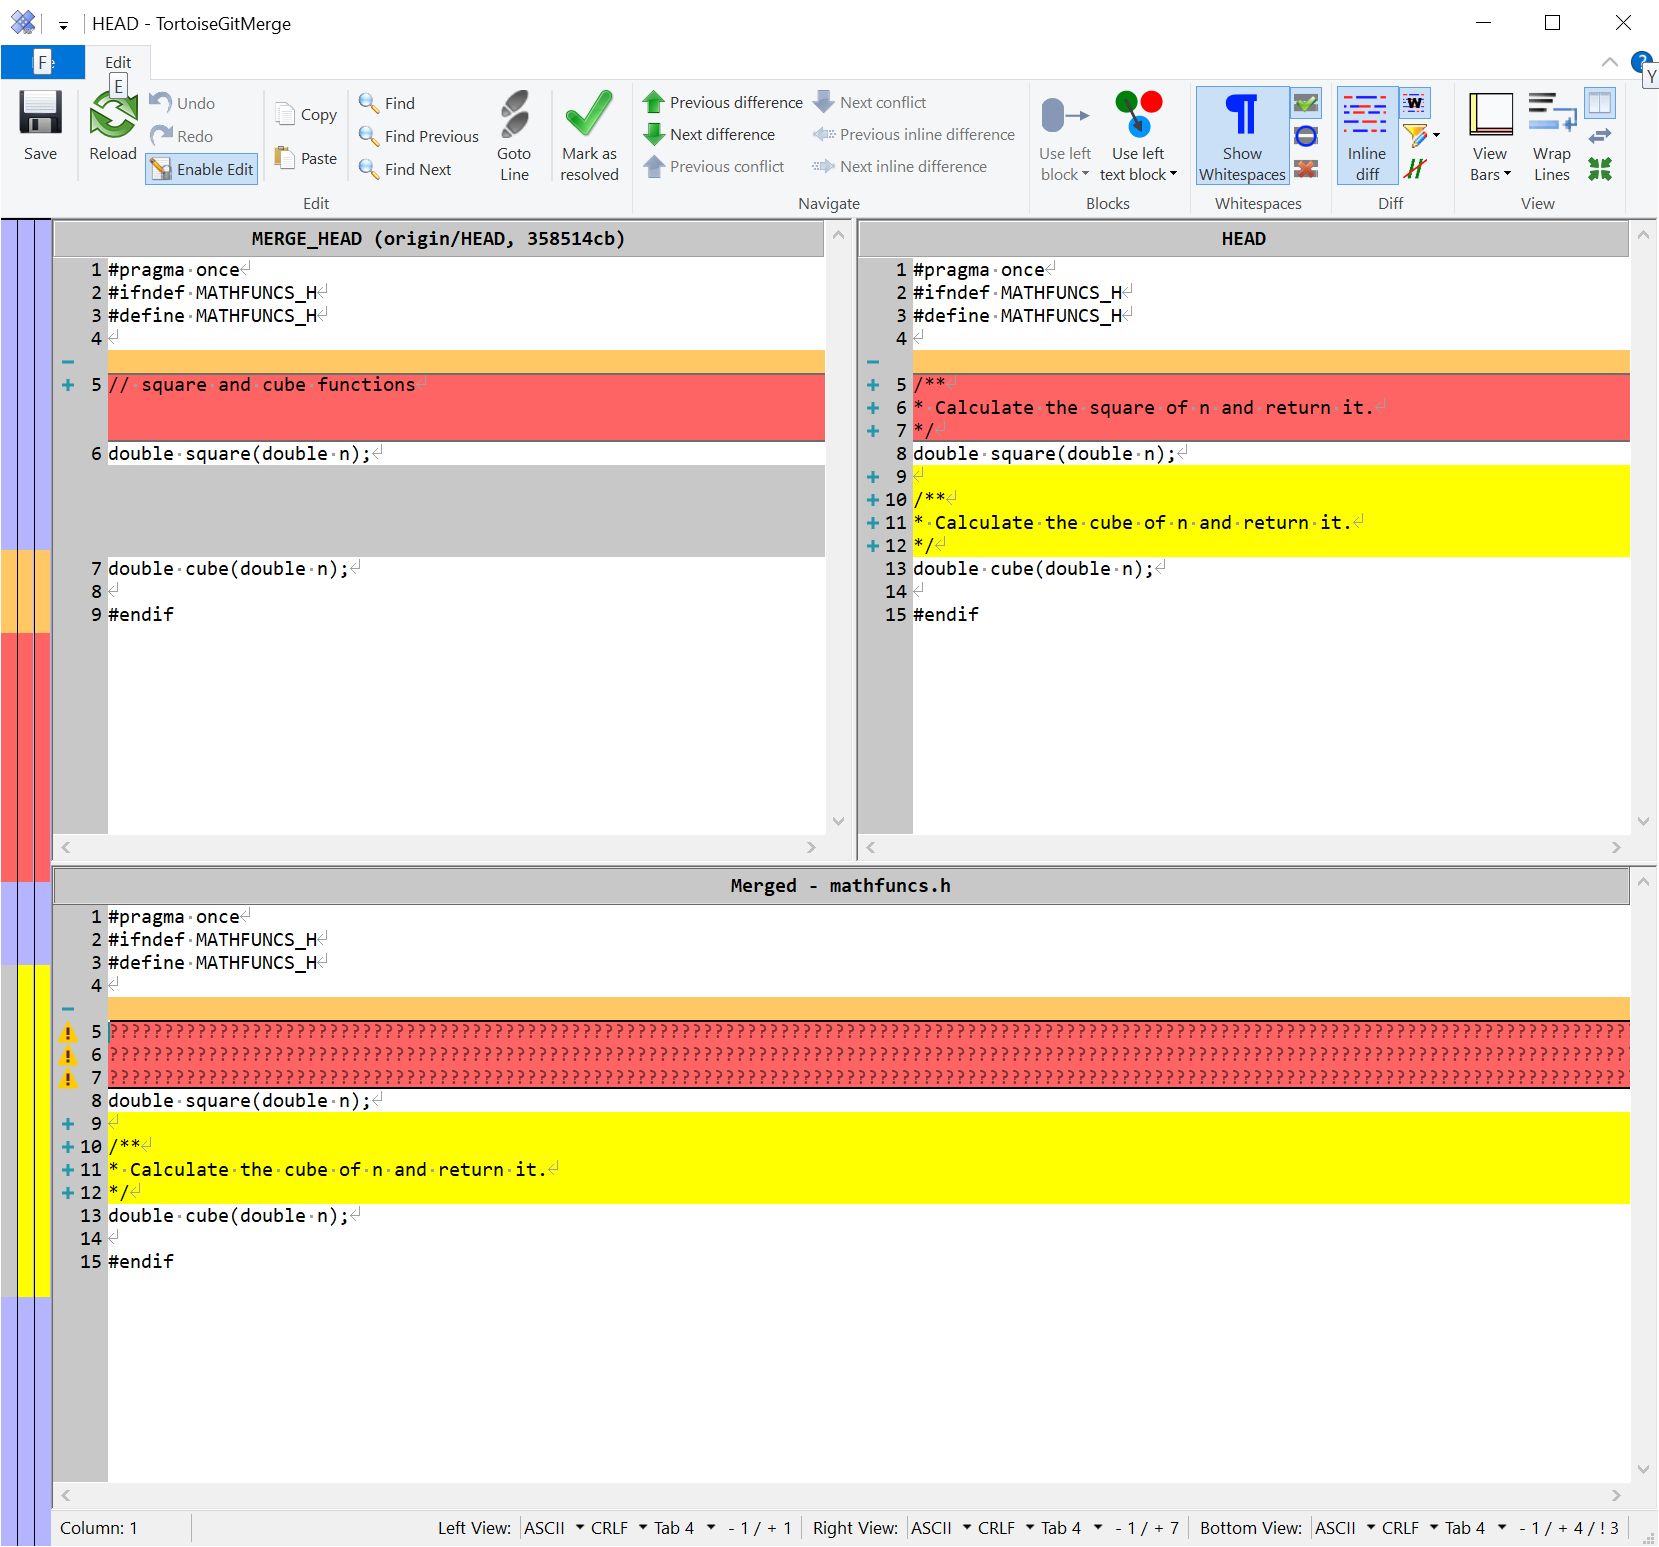
This screen has highlighted the areas that are differeent in the two versions. You can right click on the version you want and select:
- use this block or
- use this file
You can proceed through the file and try to resolve the conflicts this way. When done, you can save the file and mark the conflict as resolved. The other option is to go back to your original file and modify it to resolve the conflicts and then pull again.
You should try to avoid conflicts if possible. Conflicts means that two developers are changing the same code at the same time, which is a bad idea. Some version control systems allow you lock files so that other developers cannot change them. This can result in a major loss of productivity since developers might not be able to change a file and have to wait until another developer releases the lock. Most projects decide locking files is not worth the loss of productivity and chose to deal with conflicts when they occur. To minimize conflicts you should:
- assign work to each developer which has minimal overlap,
- give developers distinct jobs if possible,
- if developers must work on the same file, let them know so they can communicate.
Git in Visual Studio
Git is integrated into Visual Studio and it will allow you to do many of the things you can with Tortoise. However, Visual Studio has poor feedback if a pull or push does not work well and the interface is less intuitive than that provided by Tortoise. Tortoise stores your Git login credentials and Visual Studio requires you to reauthenticate for each operation. While you can use Visual Studio directly, you will find that Tortoise is a lot easier.